February 24, 2016: I originally created this page because I couldn’t find anyone who made anything like my homemade milk machine, and I wanted to help others with an economical option instead of a milk machine that is $1000+. Now Simple PULSE is available, and it is very similar in concept to what I have here – but they have experience and would be able to provide you with customer support. I would strongly encourage you to contact them to purchase a ready-to-go system instead of trying to make this one, especially if you are not mechanically inclined.
_________________________________________________________
(Originally written in 2007) I have a homemade milk machine that I bought from a friend of mine. She built it with the help of a man on a Yahoo Group. Unfortunately, she doesn’t have his contact information anymore. I have searched and searched for this man, hoping that I could link to a website if he builds and sells these milk machines, but I have not had any success locating him. Here are some pics and info to help you build one, if you desire. Hopefully, he will eventually find this page and I can give you a link to buy a pre-made milk machine directly from him. [In 2014, I upgraded to the CoPulsation System (discussed below). I included information about the the upgrade (in italics) below.]
Vacuum pump. [I upgraded to an OLD Surge Vacuum Pump that I bought used from a friend – thanks Jen!] I have a Robinair VacuMaster 2 stage vacuum pump. Model #15500. Capacity: 5 CFM. Volts: 110 v – 60 hz. Motor: 1/3 hp. It is my understanding that this is a vacuum pump that mechanics use to work on the A/C systems on vehicles. It is intended for high vacuum, so it will “smoke” and has actually spit a bit of oil out the exhaust while running when it has air going through it like a milk machine hooked to it will allow. I attached a piece of old garden hose to it and routed it out the door, it hasn’t bothered me since. This does not seem to hurt the pump at all – it is running like it always did. Here is a pump that is very similar to mine, I just couldn’t see the hp listed anywhere: Robinair 15300 VacuMaster 3 CFM Vacuum Pump This link goes to a pump that was for sale on Amazon at $161 (free tax & shipping). If the link no longer works, just do a search for that model, I found lots of them. 😉
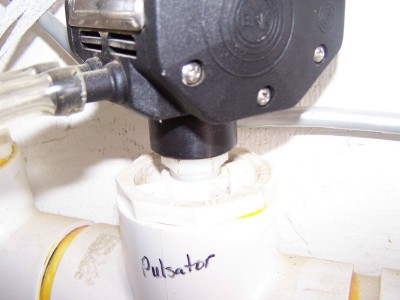
Pulsator.
CoPulsation. THIS is on my wish list. I plan to change to this system at some point i.e. upgrading my current machine, as you CAN get bits and pieces to add to this homemade milk machine, at least it appears to me that it would work with my milk machine. You DO NOT have to buy their entire milking system, the man here told me that you can upgrade your current machine. I checked with Bill at CoPulsation yesterday (May 3rd, 2011), I asked him if he would take a look at this webpage and let me know if his products could definitely be used to upgrade my milking machine. He said: “Yes, our product will easily work with your existing set up. You would simply remove your existing pulsator and turn in our pulsator. You have a nice setup put together from what I see. It is similar to one another customer of mine did a few months ago. I noted your vacuum pump. It is very similar to one I use for trade shows for my demo unit. It is designed to evaluate refrigeration systems. I have found that mine tends to push a little oil up out the breather. You want to make sure you don’t suck any milk or water into it.” (quote used with permission) I will be buying the Inflation Shells and Liners in addition to the Pulsator and the Pulsation control (from CoPulsation). You will need to contact them directly for pricing, etc. Here is a link to their site. CoPulsation ™ Milking System UPDATE (2015): I bought this upgrade (CoPulsation) in 2014 and I really like it. I also got my hands on an OLD Surge Vacuum Pump and I now use it in place of the Robinair VacuMaster 2 stage vacuum pump that I talked about up the page a bit. It is worth finding one of these vacuum pumps that are made for a milking machine. I’m much happier with the performance of my milk machine and my does are much more comfortable.
Parts Plus. This is what I had and it worked fine, but I really like the CoPulsation system that I have much more. 62725 BRK (Interpulse Type) is the name of my old pulsator, I did NOT have a pulsation controller when I used this old pulsator so maybe it would’ve worked better if I had.
Vacuum Gauge. 62543 Dial Vacuum Gauge appears to be the one that I have.
Inflations, etc. Here is a link to a Goat Claw system that is complete, instead of trying to piece it together yourself.
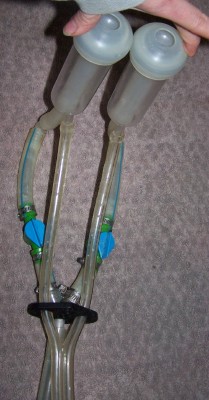
[My CoPulsation System came with a new claw assembly, so I no longer use the one that is pictured here.] This is a pic of my old one that was built from scratch, it is supposed to be taken completely apart and cleaned tomorrow – I do that on a weekly basis. (Of course, the milk machine is cleaned after each use, that is a different procedure and takes very little time. I’ll try to make a separate page about that sometime.) Anyway, please excuse the fact that it is not nice and clean on the outside for it’s debut on this page:
Hoses. You will need Milk Hose and Vacuum Hose.
Milk Hose. The Milk Hose is special and is made to have raw milk travel through it, it is food grade. Don’t just use any kind of hose for this. You will need enough to attach the PVC milk machine to the vacuum pump, another length to go from the PVC mlk machine to the milk bucket, and the last length that will go from the Goat Claw Assembly to the milk bucket (this is the only length of hose that actually has milk flowing through it.) You will probably need the 1/2″ diameter. Make sure you check the information on the Vacuum Pump you are buying though, mine has a 1/2″ “valve”.
Vacuum Hose. The vacuum hose has only the “vacuum” going through it. It goes from your pulsator to your Milking Claw. I use the “pair” type – 2 hoses attached together instead of 2 separate hoses. [My CoPulsation System came with new vacuum hose that is different than what I have pictured on this page.]
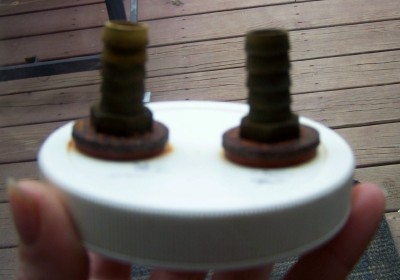
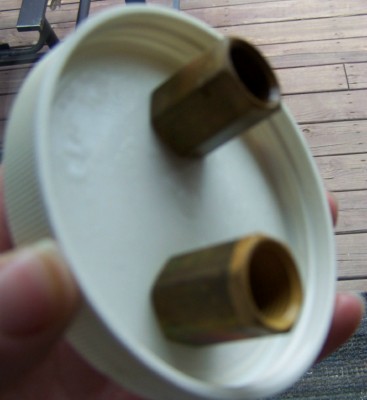
Milk Bucket. [When I upgraded to the CoPulsation System, I bought a new milk bucket and lid so I no longer use what I have pictured here. It was a nice stepping stone, so I’m leaving the pictures here for anyone interested.] This part I’m pretty proud of, I made this myself modifying my friend’s idea of welding pieces of pipe on top a metal lid to the gallon jar. I thought I’d like it better if I went to a plumbing store and found food grade parts to fit together above and below the gallon jar lid. I opted for a plastic, food grade lid on my gallon sized glass jars. I could easily do this myself, which is a necessity for me. 😉 Sorry the pics of the lid are fuzzy. My camera didn’t like focusing on the correct thing…
Glass Jar. I bought my gallon sized glass jars through Uline. Can you believe how cheap they are?! 😀
Fittings. This is harder, I don’t remember what these items are called. I know they are “barbed”, so that the hose fits very snuggly. I took a pic of the “milk bucket” lid (see above pics), so hopefully you can take it to a home improvement store (Menards, Lowes, etc) or a plumbing supply store and get help to identify them. MAKE SURE they get you FOOD GRADE type material for the parts that come into contact with the milk. The 1/2″ diameter Milk Hose has to fit over this barbed fitting, so take a piece of Milk Hose with you to test it for correct size. 😉
Washers. After your have the “fittings” described above, you will need to go find a metal washer that will fit snuggly over the top of both of the “barbed fittings”. If you want it to stay pretty (read: not rust – it doesn’t really matter if it rusts, it doesn’t com in contact with the milk), try to find stainless steel. I couldn’t locate this at the store I bought the metal washers at, maybe you will have better luck. 😉 You will also need a small package of “rubber hose washers” to place beneath the metal washer, this will help prevent leaks – the jar has to be vacuum sealed as much as possible for this to work.
Cutting Tool. My husband had a special “wood drill bit” that was 1/2″ diameter. This worked perfectly to cut holes in the top of the plastic lid. 😀
Assembly. Make sure you MEASURE the lid using the fittings, washers, etc. BEFORE you cut the holes for the fittings to ensure that you have allowed for enough room between them. Remember the old saying: “Measure twice, cut once”.
After you have used your “cutting tool” to make the 2 holes in the lid. Place the metal washer on the bottom portion of the barbed fitting, then put on the rubber washer over it. They will be ON THE TOP of the lid – they DO NOT come into contact with the milk. Take the barbed fitting, put it through the hole going through the TOP of the lid (not from the bottom). Now take the bottom threaded portion of the fitting (the “female” part) and screw it on the threaded portion of the “barbed fitting” (the “male part”). Make sure your make them as tight as you can, we need them to be airtight to hold the vacuum. You should have a fully assembled “milk bucket lid”! Now, take a Sharpy marker and label one of the barbed fittings “#1” and the other “#2”. I use #1 for the “hose that milk travels through” and #2 for the “hose the vacuum travels through” (make sure you label the hoses properly as well.) NOTE: Both of these “hoses” I’m talking about in this “assembly” section are the 1/2″ Milk Hose type. 😉
Trap. As Bill at CoPulsation mentioned above, it would be a very good idea to add a trap to ensure that water or milk does not get sucked up into the “milk machine” and make it to the pump. So far, it has only gotten into the milk machine portion and has never made it to the pump. When this happens (water/milk sucked up into the milk machine), I have to break down the PVC portion of the milk machine and clean it out. This is a pain. I want to make a small version of my “milk bucket” setup and hook it into the vacuum line that comes off my milk bucket (between the milk bucket and the PVC milk machine) so that it will catch any overflow. That way, it is simple to clean up an accidental overflow. This trap would not have to be removed at every milking, as most of the time it would remain clean and dry (until an accident happens).
Milk Filter. [Since upgrading to the CoPulsation System I stopped using this step. I use a funnel filter instead.] This came about though an accidental purchase of 2 1/4″ milk filters, instead of the 4″ type. The 2 1/4″ ones were too small to fit into my mini filter originally purchased at Caprine Supply. I needed to use them, so I tried placing one on the “milk inlet” portion of the “Milk Bucket” that I made. IT WORKED! In fact, it worked GREAT! This saves lots of time, as the milk is filtered as it is being milked. By the time it hits the milk bucket, it is filtered and ready to be put in the 1/2 gallon canning jar I use to cool and store the milk in the fridge. So glad I prayed and asked God for a way to use those filters! He is AWESOME! He has lots of witty inventions, all we have to do is ask! 😀 I have to admit, these filters aren’t intended to be used in this way (they are intended to be used as “gravity filters” and not intended to be used under vacuum), but it works very well – they hold up and I’ve been VERY happy with the milk quality.
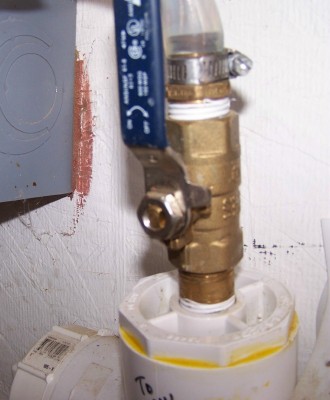
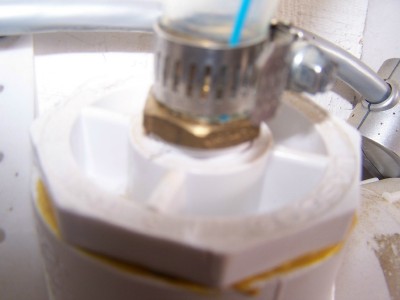
The Actual “Milk Machine. [I still use this part of the milk machine, we use it very successfully with the CoPulsation System. Note that the pulsator has been replaced with the CoPulsation pulsator, so I no longer use the pulsator pictured here.] THIS is where I get over my head. There are lots of parts that I don’t know the names for, I’m going to have to just provide pics as close up as possible.
PVC. You will need a piece of PVC pipe – not much is needed just enough to fit the “T” pieces of PCV together), 4 PVC “T” pieces (they appear to be 2″ diameter), some kind of “lid” for the “T” pieces which has a hole in the top of it (it says: 2″ 1/2″ on it, it also has “Lasco D2466” on it) and some PVC adhesive to glue them all together. Make sure you leave one of the “T” sections “unglued”, so that you can take the PVC portion apart and clean it.
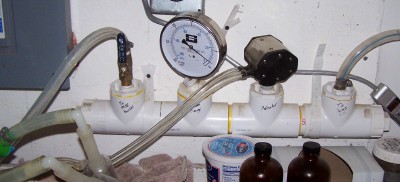
NOTE: In the above picture, the hose on the far left (with the shutoff valve) goes out to the milk bucket/claw assembly. The hose on the far right goes out to the vacuum pump.
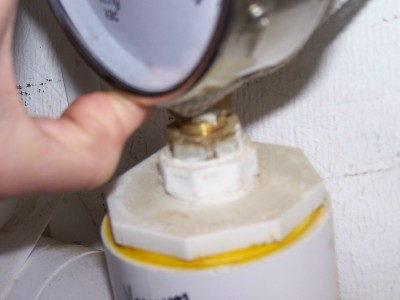
Here are other things I can identify, hopefully the pics are good enough that you can take them with you to the store for help. Shut Off Valve. Some kind of threaded fitting that goes through the 1/2″ slot on the “PCV lid” that fits on top of the PVC “T” pieces.
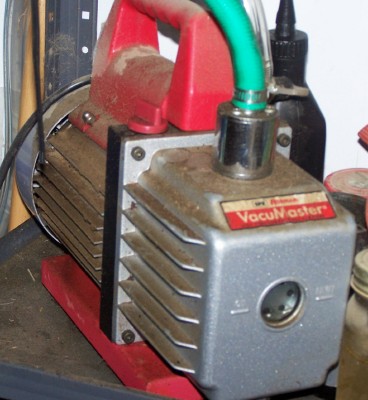
ICK! My vacuum pump is seriously dirty! <sheepish grin> It is in an out of the way place, so I don’t look at it often. See where the piece of green garden hose is clamped to the exhaust of the pump? I did that so that I could route the smoke outside instead of having it accumulate in the garage, where I milk my girls. Love my garage! It is insulated!! [I no longer use this vacuum pump. I replaced it with an OLD Surge Vacuum Pump that I bought used from a friend – Thanks Jen!!]